Category Archives: SSIS

BI xPress Version 3.2.1 Released

Earlier this month on the 14th, version 3.2.1 of BI xPress was released. With this release comes a few nice improvements that increase the ease of use.

One of the major improvements with this release (and to be honest its about time) is the ability to view packages that have been stopped by some external source (i.e. the user, the operating system, etc.). The stopped packages will now appear highlighted in blue in the Package Execution viewer. Previously it was impossible to tell which packages had been stopped by the end user, but with this improvement it’s not possible to tell which package has been manually stopped by the end user.

Packages that have not started execution are white, packages currently executing appear in yellow, packages that have successfully executed appear in green, packages that have failed are red, and packages that have been stopped are now blue.

One of the other nice improvements is the ability to detect invalid file paths for configuration files. If the file path for a configuration file cannot be found, the configuration will appear underlined and highlighted in red in the Configuration Manager.

There’s a host of other improvements and bug fixes in this release. To read the full release notes, go here. To download the trial version of BI xPress, head over to PragmaticWorks.com.

Find SSIS Variable Dependencies with BI xPress

One of the difficult aspects of SSIS package development is keeping track of where a variable has been used in an expression or whether a variable is being used at all. If you’re developing your packages with BI xPress, you can easily discover where your variables are being used if they’re being used at all.

Open your package in BIDS, and go to the Variables windows. Highlight the variables you want to check for dependencies and then click the Scan Variable Dependency icon.

1 Scan for variable dependencies icon

This will open the Variable Scanning Options. You can specify to scan all variables, which could take a considerable amount of time. In my case, I’m going to choose to scan for only the variables I have selected.

2 scan for selected variables

When the Variable Usage windows opens up, click the Scan all objects for variable usage button at the bottom. This is going to actually search our package to discover if and where the variables could be used.

3 View variable dependencies

Once the scan is complete, we can see on the right side of the window the tasks where our variables are used. In my case, my selected variable is used in an Execute SQL Task and a Script Task. If I highlight the Script Task, I can even view the script and see where the variable is used.

Any variables that are not being used in the package will show up under the Unused Variables node. At the bottom of the window you’ll notice that we have the option to either rename or delete these unused variables.

Head to PragmaticWorks.com to checkout BI xPress and download the free trial version.

BI xPress wins “Best Business Intelligence and Reporting Tool” from SQL Server Magazine

Last week it was announced that Pragmatic Works’ tool, BI xPress, won the SQL Server Magazine Gold Editors Choice Award for Best Business Intelligence and Reporting Tool and the Silver Community Choice Award. 

BI xPress allows for real time monitoring of all your SSIS packages executing on your servers. The way that BI xPress can allow you to monitor your SSIS package in real time is by applying a standardize auditing framework across all of your SSIS package using the BI xPress Auditing Framework Wizard. The Auditing Framework captures errors, warnings, and runtime details to create an execution log that can viewed in real time. This information makes it very easy to debug and track down problems with your SSIS packages.

So lets walk through applying the Auditing Framework to several packages a coworker developed to load a data warehouse.

To apply the Auditing Framework, I will select my packages in the Solution Explorer, right-click one of the packages and select Add/Remove Auditing Framework (BI xPress).

1 Select Packages

After selecting the packages, we need to set up the auditing database where all our package’s execution information will be stored. I can also choose to generate an configuration file for the connection to the auditing database.

3 Connection Information

On the next tab we select our logging options. We can enable real time monitoring, variable change tracking, row counts, connection information, and even SQL statements.

4 Logging Options

If we have any user variables we wish to track, we can specify those on the Advanced User Defined Logging tab.

5 Advanced User Defined Logging

After clicking Next we then applying the Auditing Framework.

7 Processing Summary

With the Auditing Framework applied, we can see the Row Count Transforms that are added to our Data Flow Tasks to track the rows from sources and into destinations.

8 Row Counts

Scripts tasks have also been added to Event Handlers to write to our Auditing Database when the packages execute or if an error or warning occurs.

9 Event Handler Script Tasks

With the Auditing Framework applied, we can now watch our packages execute in real time on the server.

10 Real Time Monitoring

As powerful as the Auditing Frame is, it’s only one of the features of BI xPress. Head over to PragmaticWorks.com to read more about the other features of BI xPress and download the trial version.

Data Cleansing with Regular Expressions in SSIS

Regular Expressions are a powerful way for you to search for patterns in strings of text. In SSIS, we can leverage Regular Expressions to assist us in cleansing data. I’m going to show you a couple different ways we can accomplish this task.

The first method involved using a Script Component within a Data Flow Task to remove unwanted characters from our data. In this example, I’ve created some junk data that contains a mixture of letter and numbers.

image

I want to eliminate the letters from each value. To accomplish this, I will use a Script Component as a Transformation.

First, drag the Script Component into your Data Flow. Make sure you select the Transformation option and click OK.

Next, open the Script Component Editor and go to the Input Columns tab. Select the field you wish you cleanse and set the Usage Type to ReadWrite.

image

Then go back to the Script tab and click the Edit Script button near the bottom.

image

Add the following code to your Script Component:

using System;
using System.Data;
using System.Text.RegularExpressions;  //<<— Added to allow the use of regular expressions
using Microsoft.SqlServer.Dts.Pipeline.Wrapper;
using Microsoft.SqlServer.Dts.Runtime.Wrapper;

[Microsoft.SqlServer.Dts.Pipeline.SSISScriptComponentEntryPointAttribute]
public class ScriptMain : UserComponent
{
public override void Input0_ProcessInputRow(Input0Buffer Row)
{
//TestJunk is the field I am cleansing. Make sure you use the correct field name.
       Row.TestJunk = RegExCleanse(Row.TestJunk);
    }

public String RegExCleanse(String field)
{
// This is the RegEx pattern we are looking for
String RegExPattern = “[a-z]”;

Regex objRegExp = new Regex(RegExPattern);
field = objRegExp.Replace(field, String.Empty);
return field;
}
}

Once you’ve pasted the script into the Script Component and changed the name of the field and are using the desired RegEx, click OK a couple times to close the script editor and the Script Component Editor. We are now ready to test our script.

Here are the results of our RegEx data cleanse:

image

All the letters have been removed from our text strings.

But there’s actually an easier way to handle data cleansing with Regular Expressions. It’s called the RegEx Replace Transform and its included in Task Factory developed by Pragmatic Works. So lets take a look at how easy it is to use RegEx to cleanse our data without a bit of scripting.

image

I’ve already added the RegEx Replace Transform to my Data Flow Task and connected it up to my OLE DB Source. Double-click the RegEx Replace Transform to open the editor.

Next, click the drop down arrow next to the field you wish you modify with RegEx. Now we can configure the transform to perform the desired cleansing. For the Action, select “Replace matching regular expression pattern with user defined value.” You can also choose to extract a string of text from your field based on the RegEx patten you specify.

For the Output Action, select “Replace the column data with fixed data.”

Lastly, specify the RegEx patten next to “Search RegX Pattern.” Then click OK. Your configuration should closely resemble mine, seen here.

image

Now when I run my Data Flow Task, all letters are removed from my data. The RegEx Replace Transform from Task Factory is an explosive tool that easily allows you to utilize Regular Expressions to scrub your data without the need to write complicated scripts.

Also, just an FYI. If you’re interested in learning more about RegEx or need some helping writing Regular Expressions, check out http://gskinner.com/RegExr/. This site is an amazing learning tool when it comes to RegEx.

SSIS Batch Update without Staging the Data

The native SSIS functionality currently prevent you from performing a batch update from a Data Flow Task without staging the data. If you wish to update records from within the Data Flow Task, you’re going to have to use the OLE DB Command transform, which is very slow. If you’re update more than just a few records, I’d highly recommend first staging the data and then using an Execute SQL Task to perform the batch update.

Or you could just use the Task Factory Update Batch Transform from Pragmatic Works and avoid staging the data at all or having to use the performance-devouring OLE DB Command transform.

10-31-2011 3-07-16 PM

The Update Batch transform included with Task Factory utilizes an ADO.Net connection to perform a batch update of a SQL Server table quickly and efficiently. Configuring the Update Batch transform is very easy.

After dragging the Update Batch transform into your Data Flow design area and connecting a Data Flow Path to it, you can then double-click the transform to open the Update Batch Transform editor.

First you’ll need to either create a new ADO.Net connection or select an existing connection. In my case, I’m going to select a previously existing ADO.Net connection, ADO NET AW.

10-31-2011 3-13-31 PM

Next I’ll select the Table I would like to update. After selecting the table, I need to specify which column(s) should be used as key values in determining if a record in the table is a match and meets the criteria for updating the record. I can either select a single column or multiple columns to create a composite key.

10-31-2011 3-15-44 PM

Lastly, any fields in the table that I do not wish to update should be marked as ignore. Fields that need to be updated should mapped to the corresponding field in the Destination Column.

Now we’re ready to update our records in batch without the need for staging. One of the neat advantages to using the Update Batch Transform from Task Factory is the ability to use this transform as a destination or a transformation. If I choose to do so, I can allow the records moving through the data flow to move on to another transformation or destination, as you can see here.

10-31-2011 3-18-30 PM

I’ve found the Update Batch Transform to be very useful when performing mass updates. I’ve seen tremendous performance gains in my SSIS packages since I no longer need to perform additional reads/writes to first stage the data and then perform the update.

Head to PragmaticWorks.com to download the free Task Factory trial and check out some of the other useful task and transformations included with Task Factory.

Quickly Edit Package Configuration Values from BIDS

If you’ve followed my blog at least somewhat, you’ve probably read a blog post or two where I cover one or several of the really cool features of BI xPress. That’s because, simply put, BI xPress is a very versatile and useful tool that no SSIS developer should be without. It pains me to think about all the time I have to waste whenever I go work for a client that does not have BI xPress.

With that said, one of the smaller but more useful features of BI xPress that I found myself making use of is the Quick Config Edit feature. With Quick Config Edit, you can easily view the configurations being used in your package and edit the values of those configurations very easily, all without leaving BI xPress.

To open Quick Config Edit, go to the BI xPress menu at the top of BIDS and select Quick Config Edit.

10-31-2011 2-17-05 PM

Once Configuration Editor is open, you’ll need to specify where your configurations are stored, whether it be on the File System or in a SQL Server table. In my case, I’m using a SQL Server table to configure this particular package. Specify the server, the credentials used, the database, and the table.

10-31-2011 2-23-37 PM

You’ll then be able to view the Configurations in your package, the package properties being configured, the values used to configure the package, and also make changes to those configurable values. It even becomes possible to edit multiple package configurations at one time.

10-31-2011 2-39-22 PM

Here you can see a configuration I have for a connection string. From this window I can easily adjust the connection string stored in the SQL Server table. Once I make a change to the Value I can just click Save to make the change final.

10-31-2011 2-27-32 PM

This is an example of a configuration for a Package Variable. From this view I can easily see the scope of the variable (Foreach Loop Container, in this case), the variable being configured, and the value of the package configuration.

10-31-2011 2-27-48 PM

Quick Config Edit also has a very handy feature that makes is easy for you to do a quick Find and Replace of your package configurations, allowing you to update multiple package configurations in the blink of an eye.

10-31-2011 2-34-09 PM

Quick Config Edit is a very simple but extremely useful feature. It may seem small, but these are the kinds of features that increase the speed of package development by allowing you to stay in the BIDS environment. This is hands down one of my favorite features of BI xPress because it is so convenient.

Check out this page if you’d like to read more about the features of BI xPress.

Manage, Save, and Share SSIS Expressions

If you’re even slightly familiar with SSIS you know that one of the incredible strengths of SSIS is the ability to make packages dynamic in countless different ways. One of the ways SSIS accomplishes this is through the use of SSIS expressions and the expression language.

BI xPress has a really useful feature called Expression Manager. The Expression Manager is a very cool feature that allows an SSIS developer to create, share, and manage custom SSIS expressions.

Creating your own SSIS expressions is very easy. Simply open BI xPress and click the Expression Manager button in the top right of the window.

Capture 2

Or if you’re already developing a package in BIDS, go to your variables window and click the Expression List icon.

Capture 3

Now that the Expression Manager is open, we can browse the canned SSIS expression or create our own. Let’s create our own custom SSIS expression for us to use later on or share with our development team.

First, click the Create New Expression icon.

Capture 4

Then give your expression a name and a description. My expression is going to append the user’s name and the date to create a file name. Here you can see the expression.

Capture 5

And in case you want to copy it for use:

"C:\\DataOut\\Archive\\"  + RIGHT(@[System::UserName],FINDSTRING(REVERSE(@[System::UserName]), "\\", 1)-1)
+ (DT_WSTR,4)YEAR(GETDATE()) + "-"
   + RIGHT("0" + (DT_WSTR,2)MONTH(GETDATE()), 2) + "-"
   + RIGHT("0" + (DT_WSTR,2)DAY( GETDATE()), 2) + ".txt"

In my expression you can see that I leverage the UserName system variable to get the name of the user executing the package. I use FindString and Reverse to eliminate the domain and \ from the UserName, as well. Once you’re done, click Save and then click OK to close the Expression Manager.

Now that our expression is saved, we can use our expression in our SSIS packages. To utilize our expression in the package all we need to do is the use the BI xPress Expression Editor. We can clearly see our new expression in the My Expressions folder.

Capture 6

Besides allowing a user to manage their own custom SSIS expression, the Expression Manager features a host of canned, commonly used SSIS expressions. This drastically reduces the learning curve of the expression language. The Expression Manager comes with expressions that can create a file path and name with the date appended, create a dynamic SQL statement, or calculate the beginning of the previous month, just to name a few.

Capture 1

As you can see, the Expression Manager is a very powerful tool that allows you to fully realize the power of the SSIS expression language. To download a free trial version of BI xPress, check out PragmaticWorks.com.

Quickly Apply SSIS Package Configurations to Multiple Packages with BI xPress

One of the most powerful features of BI xPress, in my opinion, is the Package Builder Wizard. The Package Builder Wizard allows an SSIS developer to create a template from a package or a from a few components of a package. The developer can then use those templates to create new packages or alter existing packages. In this short post, I’m going to walk through creating a template that contains a package configuration and then show you how to apply that template to all the packages in my SSIS project.

Recently I was consulting for a client that required me to add multiple package configurations to dozens of existing packages. Using the follow method, I completed that work in less than an hour. Needless to say, the client was very impressed and has since bought many copies of BI xPress.

If you’d like to follow along with me, visit http://www.PragmaticWorks.com and download the free trial of BI xPress.

I’ve got an SSIS projects that has a few packages in.

Capture1

My requirements are that I need to put package configurations on each of these packages so that way I can manage the package’s connections outside of BIDS.

The first thing I need to do is create package configurations for the properties I’d like to configure from outside the package. In my case, I’m creating two package configurations: One for my connection to my destination database and another for the connection to my auditing database.

Capture2

To create a package configuration, right-click in a blank area of the Control Flow and select Package Configurations.

Capture3

With the Package Configuration Organizer, make sure to check the check box to Enable Package Configurations. Then click the Add button. Next select the type of Configuration. In this example, I’m creating an XML configuration file (.dtsConfig). Specify the file path and name of the dtsConfig file. Then click Next.

Capture4

On the next screen, select the property that you want to configure. I’m going to select the ConnectionString property for the CashForClunkersDW Connection Manager. Click Next.

Capture5

On the final screen, give the Configuration a name and click Finish. I then created an additional configuration file for my other connection. Here you can see the two configurations I created.

Capture6

Now that I’ve created the package configurations I want to apply to all my packages. I need to create a template. To create a new template, right-click in an empty area of the Control Flow and select Package Builder Wizard (BI xPress).

Capture7

When the wizard opens, select the option on the top left to create a New Template (From Selection). Specify the Template Name and select the folder to store the template. Click Next.

Capture8

On the next screen, select the package objects to include in the template. Scroll all the way to the bottom of the Configurable Objects window and select the Package Configurations. Then click the Next button.

Capture9

Then click Start on the next screen to create the template. Now that the template is created, now we can apply our template to the rest of our packages. In the Solution Explorer, select the packages you want to apply the new template to by holding Ctrl and clicking. Then right-click one of the selected packages and select Package Builder Wizard (BI xPress).

Capture10

Make sure the option to Modify Packages (From Template) is selected. Click Next.

Capture11

Then I’m going to select the template I just created.

Capture12

On the next screen you should see the packages you selected in the Solution Explorer. You can select other packages or deselect. Click Next again. On the next screen, click Next again.

If a warning message appears letting you know that the package layouts will be modified, click Yes to continue. Then click Start to apply the template to the packages.

After applying the template to the other packages, make sure you open each package and check the configurations just to make sure everything went as planned before you start testing. And that should be it! You just added package configurations to all of your packages in a matter of minutes using BI xPress.

Audit and Watch SSIS Packages Execute on the Server

Among the many cool features of BI xPress is the extensive and robust Auditing Framework available right out of the box. With the BI xPress Auditing Framework, a user can track errors, warnings, row counts, variable, connections, source queries, and many other package properties. Whether you’re applying this incredible Auditing Framework to a single package, a dozen packages, or 100 packages, stepping through the wizard only takes a few moments. In this post, I’m going to walk you through applying the Auditing Framework to an SSIS package.

We’ve got a simple package that loads a dimension in a small data warehouse based on the Cash For Clunkers data.

Capture1

Now lets add the BI xPress Auditing Framework. To apply the Auditing Framework, I can simple right-click the package in the Solution Explorer and select Add/Remove Auditing Framework (BI xPress).

Capture2

This will launch the Auditing Framework Wizard. After clicking Next on the opening screen of the wizard, select the option to apply the Auditing Framework. Likewise, you can remove the Auditing Framework by selecting the other option. Click Next.

Capture3

Select which packages you’d like to apply the Auditing Framework to. You can select packages in a File System, on a SQL Server, or in an SSIS project to name a few locations.

Capture4

Click Next. Now you’ll have to create the Auditing database or select the Auditing database if it already exists. If you need to create the database, specify the server you want to create the database on and click the Create New Database button.  Make sure you click the Create new connection button to create the Connection Manager in the SSIS Package that points to the Auditing database. You can also check the check box to create an XML Package Configuration file.

Capture5

Then click the Logging Options tab. On this tab, you can specify DataFlow Logging, Variable, Connection, and other logging properties. Using these options, we can specify to log dataflow source and destinations row counts, real time data flow monitoring, connections, variables, and other properties. All of these options are selected by default so we’ll leave these selected.

Capture6

On the Advanced tab, you can specify if there are any other customer user variables that you would like to log. And on the Alert Filtering tab, you can specify which warnings you do not want to log, for example any truncation warnings using the Warning Editor.

Capture7

Click Next. Then click Start to apply the Auditing Framework to the package. When the process is complete, click Finish. Now that we’ve successfully added the Auditing Framework to the package, lets take a look at it.

The first thing you’ll probably notice is the new Connection Manager connecting to our Auditing database where all our auditing data is kept. Then if you open any data flow tasks, you’ll notice that they appear “jumbled up” after adding the Row Count Transforms. Simply reformat the data flow. Notice the Row Count counting rows out of the source and the second Row Count transform counting rows into the destination. The row count info is stored in variable.

Capture8

This information is then written to our database using tasks located in our SSIS package’s Event Handlers, such as OnError, OnWarning, OnPreExecute, OnPostExecute, and possibly in the OnVariableValueChanged Event Handler if you specified to track variable change history.

Now that we’ve applied the Auditing Framework, I’ve deployed the package to my server and executed it a few times in order to create a history of executions. One of the really cool things about BI xPress is that after applying the Auditing Frameworks we can watch our SSIS packages execute on the server as if we were watching them in BIDS! To open the BI xPress Monitoring Console, click the BI xPress menu in BIDS and select SSIS Monitoring Console.

Capture10

In the SSIS Monitoring Console, one of many reports you can use to troubleshoot your SSIS package executions is the Execution Control Flow Diagram. We can watch the Control Flow and Data Flow while the package executes on the server. Any Errors and Warnings that occur will be instantly visible and we can also see the values of logged package variables. To see a full list of all the reports available right out of the box, click this link.

The BI xPress Auditing Framework is unlike any other out of the box framework available. It’s complete and thorough and gives us, as SSIS developers, more than Microsoft ever dreamed in regards to SSIS troubleshooting. To download a free trial of BI xPress, visit PragmaticWorks.com.

Setting Up a Macro in the BIDS Toolbar to Execute an SSIS Package

Here’s an extremely helpful little tip that my friend, Ken Hendrix, showed me the other day. Currently, to execute a single SSIS package in  BIDS, you have to open the Solution Explorer, right-click the package, and click Execute. If you’re debugging a lot or do not have your Solution Explorer open, this can sometimes be a little inconvenient. So Ken came up with a Macro that you can add to your tool bar that will allow you to execute your open package with a single click.

1. The first step is to create the Macro. With BIDS open, click View, select Other Windows, and Select Macro Explorer.
2. In the Macro Explorer, expand MyMacros and right-click on Module1. Select New Macro.

20110729 Execute Package Macro

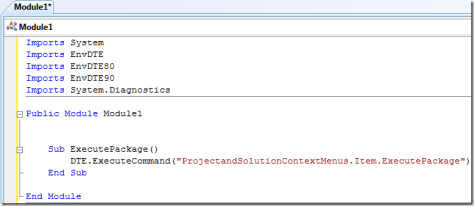
3. Change the Macro Sub Name to ExecutePackage and add the Sub below:

Sub ExecutePackage() DTE.ExecuteCommand("ProjectandSolutionContextMenus.Item.ExecutePackage") End Sub

Your macro should look like this:

Macro

4. Now we need to add the Macro to the toolbar in BIDS. At the end of the Standard toolbar, click the little drop down arrow, select Add or Remove Button. Then select Customize.

Add macro button

5. On the Commands tab of the Customize window, select Macros in the Categories pane. Find the Macro you created. It should read MyMacros.Module1.ExecutePackage if you gave it the same name as I did. Next, drag the Macro into the toolbar where you would like it to be.

Find MyMacro

6. With the Customize window still open, right-click the Macro in the toolbar, click Change Button Image, and select the icon you would like to display for your Macro. I selected the little running man. Lastly, right-click the Macro in the toolbar and click Default Style to remove the text next to the icon in the toolbar.

Change icon

And you’re finished! To execute an SSIS package with the new Macro, either highlight the package in the Solution Explorer or focus on the tab with the open package. Then click the icon to execute your Macro.

Macro toolbar Icon

I hope someone else finds this as helpful as I did. Thanks, Ken!